Recipes for Times of Sheltering in Place
- Mar 31, 2020
- 55 min read
Updated: Jan 15, 2021

These are challenging times with the coronavirus pandemic. Many of us are staying at home as we social distance, self-isolate, or self-quarantine. Our relationship with food has changed, and cooking and eating have taken on new roles -- of diversion from stressful times, sustenance when we must be especially conscious of taking care of our bodies and health, and of course, pleasure. As a result, people are developing a new vocation or pastime that is contributing to creativity and empowerment while they are enjoying the novelty of eating structured or scheduled meals with their families, a companion, or just plain alone in this highly electronic age of telecommunications and social media.
What to cook when you've never cooked before, when food items are unavailable at the supermarkets, when restaurants and cafes are closed except for take-out or delivery, or when one needs time away from the kids? I've collected a few simple, easy, and healthy recipes which don't take a lot of time or require "exotic" ingredients. Rather, they use items that are in your kitchen cupboards or pantries, and readily available at most supermarkets. These are recipes that even your children can make.
Here's a list of what you'll find as you scroll down:
Perfect Chocolate Chip Cookies
Ratatouille
Glazed Plum Tart
Angel Food Cake
Tarte Tatin
Tomato Pies
Lemon Lavender Avocado Loaf
Ruby Robey's Strawberry Shortcake
Croissants aux Amandes (Almond Croissants)
A Salad-Hater's Favorite Salad -- Baby Spinach with Pignoli Nuts and Pears
Grilled Brie and Pear Sandwich
Artichoke Tapenade
One Bowl Yellow Cake
May Daisy Cocktail
Broiled North Fork Grass-Fed Beef Tri-Tip Steak for Two
Big Bill's Tomato Chutney
Pizza
Thai Shrimp Coconut Soup with Shitakes and Lemongrass
Creamy Braised White Beans
Two Casseroles -- Apricot Chicken and Sour Cream-and-Mushroom Chicken
Baked Steel-Cut Oats with Nut Butter
Made-in-the-Pan Chocolate Cake
Split Pea Soup
Lentil Soup with Sausages
Kiwi-Berry Pavlova
Pasta with Marinated Artichokes and Sun-dried Tomatoes
Bess Feigenbaum's Cabbage Soup
Pantry Crumb Cake
Steamed Fish with Ginger
Pasta Primavera
Food: Leave It for Leftovers
Salmagundi Two Calves' Feet Recipe
Lamb Shank and Wheat Berry Soup (coming soon!)
In the next few months, I'll be adding to this quarantine recipe diary. Please send me a recipe of yours via my contact page and add a photo of the finished product if you have one.
Few of us may have control over our food supply or the space to grow a garden to become self-sufficient and self-sustaining like these folks in the photo. But if we all could heed the words and actions of Chef José Andrés, founder of World Central Kitchen (WCK), a non-profit devoted to providing meals in the wake of natural disasters, we and our planet would be in a better place.


Farmers have been particularly hard hit by the coronavirus pandemic. We hear of dairy farmers who are throwing out milk because restaurants are closed and no longer serving food; of workers at pig slaughter houses becoming ill with Covid-19 and plants shutting down. Supermarket shelves are wiped clean of certain food items -- from meats like chicken to yeast. Grocery prices have gone up exponentially. Food pantries have opened to serve the unemployed and others who can no longer afford to buy food for their families or serve three meals a day. A number of people who have time and space have begun to create their own vegetable gardens. To the right is my small contribution to the "growing" food project and the recipes which follow below.
***
Perfect Chocolate Chip Cookies
(adapted by Charlotte Druckman from Ravneet Gill, "The Pastry Chef's Guide: The Secret to Successful Baking Every Time" (Pavilion, 2020) in New York Times Cooking, October 16, 2020)

British pastry chef Ravneet Gill has created a wonderful recipe for chocolate chip cookies, different from other chocolate chip cookies in their having dense puddles of goo. She is meticulous in her instructions, and you should be, too, in following them. One is instructed to chill the cookie dough overnight so that the cookies will not spread when baked, and to roll the dough into balls before putting them in the refrigerator in order to get a nice plump, domed cookie -- not a sad flat one. Always use dark chocolate and kosher salt if you don't have Maldon sea salt.
Yield: 14 cookies
Time: 30 minutes, plus 12 hours' chilling
Ingredients:
1/2 cup plus 2 tablespoons/140 grams unsalted butter (1 1/4 sticks), softened
Scant 3/4 cup/140 grams dark brown sugar
2/3 cup/110 grams superfine sugar
1 large egg
1 3/4 cups plus 2 tablespoons/250 grams all-purpose flour
1 teaspoon baking powder
3/4 teaspoon baking soda
3/4 teaspoon Maldon sea salt (or kosher salt)
6 ounces/170 grams dark (bittersweet) chocolate, chopped into large chunks
Instructions:
1. Put the butter and both sugars in a stand mixer or mixing bowl. Cream together using a paddle attachment on medium speed, a handheld electric whisk or a wooden spoon for 1 to 2 minutes until paler but not fluffy. (Do not mix for too long; if you beat the mixture until super light and fluffy, that will cause the cookie to deflate later when cooking.)
2. Add the egg and beat over medium speed until evenly combined.
3. In a separate bowl, mix together the dry ingredients (all the flour, baking powder, baking soda and salt), then fold into the butter mixture using a rubber spatula until combined.
4. Add the chopped chocolate and fold into the dough until evenly distributed.
5. Immediately scoop out heaping 1/4-cup portions (about 60 grams), roll into balls and place on two baking sheets lined with parchment paper. Cover with plastic wrap and refrigerate at least 12 hours. (If space is tight, you can condense them on one sheet before refrigerating, then redistribute among two sheets before baking.)
6. The next day, heat the oven to 350 degrees.
7. Make sure the dough balls are evenly spaced out among two baking sheets, as they will spread. Bake the cookies for 13 minutes (or 15 minutes if baking from frozen), until the cookies are puffed and golden at the edges. You want the middle to be ever so slightly, not-quite set.
8. Allow the cookies to cool on the baking sheet; they will continue firming up as they cool. Once cooled, eat! These cookies will keep in an airtight container for up to 3 days. The balls of dough will keep for up to 2 days in the fridge or 2 weeks in the freezer.
***
Ratatouille
(adapted from Julia Child, Mastering the Art of French Cooking, vol. 1 (1961))

My summer garden is thinning out and producing fewer vegetables as our nights become cooler and the days become shorter. Now I have the space to plant other seeds this fall in order to cultivate long, purple beans, arugula, and radishes which I had no room for in June.
I have already picked the few remaining tomatoes, the long, thin Italian eggplants, the yellow squash and green patty pan squash, and the single bell pepper. How should I use them? I immediately thought of Julia and her recipe for ratatouille. While my bell pepper was oh so small and I didn't have quite enough tomatoes (the recipe calls for a pound and a half), I decided to make the dish anyway, but serve small portions. And Julia didn't disappoint!
Serves 6 - 8
Ingredients: 1 medium eggplant (about 1 pound/450 g) 3 to 4 small zucchini (about 1 1/2 pounds/675 g) 1 teaspoon salt 1/2 cup/125 ml olive oil, plus more if needed 3 green bell peppers (about 1 pound/450 g), cored and diced 1 medium onion (about 1/2 pound/225 g), sliced 3 or 4 closes garlic, chopped Salt and pepper 2 or 3 large, very ripe tomatoes (about 1 1/2 pounds/675 g) 2 to 3 tablespoons chopped parsley
Use a medium, enameled cast-iron casserole or Dutch oven.

Instructions: 1. Trim and peel the eggplant with a vegetable peeler. Cut it lengthwise into 3/8th-inch/8 mm slices, about 3 inches/7.5 cm long and 1 inch/2.5 cm wide. Rinse and trim the zucchini, then cut them into slices about the same size as the eggplant. Put the eggplant and zucchini in a bowl, toss with the salt, and leave them 30 minutes -- salt draws out the juices. Drain the eggplant and zucchini and dry them on paper towels. (Because my Italian eggplants were tiny and tender, I did not peel them but left the skins on.) 2. In a large skillet, heat 2 or 3 tablespoons of the oil. Add the eggplants and zucchini and sauté over brisk heat, browning them lightly and adding more oil as needed, 1 to 2 minutes on each side. Set the eggplant and zucchini aside. 3. Add the peppers and onion to the pan with a little more oil and sauté, stirring often, until tender and the onions are starting to brown, 8 to 10 minutes. Stir in the garlic and season with salt and pepper. 4. Peel, seed, and slice the tomatoes. Spread the tomatoes on top of the peppers and onions and cook over low heat until the tomato juices start to run, about 5 minutes. Increase the heat and cook, stirring, until most of the juice has evaporated, 3 to 5 minutes. Set the tomato mixture in a bowl. (Again I did not peel and seed the tomatoes as they were fresh from my garden and juicy.) 5. Oil the casserole and spread one-third of the tomato mixture in the bottom. Sprinkle some parsley on the tomato mixture, then top with half the eggplant and zucchini. Add another one-third of the tomato mixture, sprinkle with parsley, and top with the remaining eggplant and zucchini. Make a final layer with the remaining tomato mixture and sprinkle with parsley. Cover the casserole and simmer over low heat for 10 minutes. 6. Uncover and baste the vegetables with their juices. Taste and adjust the seasonings. Continue simmering, uncovered, until the vegetables are moist and tender, about 15 minutes longer -- if overcooked, the vegetables will become soggy. Serve the ratatouille, very warm or at room temperature, in the casserole. It will keep for up to 2 days in the refrigerator; warm it slightly before serving, as chilling may subdue the flavor.

Note: The cooking and sautéing times can all be adjusted to suit your tastes and the freshness of the produce. The photo shows the pepper, onions, garlic, and tomatoes cooking in the tomato juices before they are put into the cast-iron casserole with the eggplant and zucchini mixture.
***
Glazed Plum Tart
(adapted from Edna Lewis, The Taste of Country Cooking (1976))
Edna Lewis is one of the great American cooks who was instrumental in creating the canon of the American table, recognizing and privileging its southern influences. She refused, however, to call herself a chef.

This simple tart recipe, adapted from Edna's cookbook, The Taste of Country Cooking, is a rare treat. While the plum season may be short, the beauty and taste of the pastry depend upon the plums. They should be purple plums and almost bursting from the seams with juice. The dough is like a sugar cookie, only with butter holding it together. The dough is so easy to make that you can use it for other tarts or pies. I experimented with peaches and mango. The peaches were juicy and worked well, but the texture of the mango did not lend itself to a successful filling for the tart.
Measurements here are also given in the metric system as it is more exact.
Use a 9-inch/23 cm tart pan with removable bottom or shallow springform cake pan, greased
Serves 6-8

Ingredients:
For the filling:
1 1/2 pounds/675 g purple plums
23 cup/140 g sugar
For the pastry dough:
1 cup/125 g flour, more for rolling
1/4 cup/60g sugar
1 stick/110 g butter, diced, more for the pan
1/2 teaspoon salt
Grated zest of 1/2 lemon
Toppings optional
Instructions:
1. Heat the over to 425° F/220° C and set a rack in the center. 2. Wash and drain the plums, halve and pit them. Set the plums, cut side down and in a single layer, in a shallow baking dish. Sprinkle them with sugar and bake until the juice runs freely, 12 to 15 minutes. Set the plums aside to cool. Leave the oven on and reduce the temperature to 350° F/175° C.
3. Make the pastry dough: In a bowl, combine the flour, sugar, butter, salt, and lemon zest. With your fingertips, rub the ingredients together to form crumbs, then press them together into a ball of dough. Knead the dough in the bowl for 15 minutes, working in 1 to 2 tablespoons more flour if needed -- it should be rich and sticky. (Alternatively, the dough can be mixed and kneaded with the dough hook of a stand mixer, allowing 3 to 5 minutes.)
4. Form the dough into a thick circle and place it into a greased tart pan. Press it over the bottom and sides of the pan with your fist, making a rim that is 3/4 inch/2 cm high and about 3/8 inch/8 mm thick. Arrange the cooked plums, cut side up and in concentric circles, on the dough, reserving the syrupy juice. Bake until the crust is lightly browned, 30 – 35 minutes.
5. Take the tart from the oven and let it cool. Transfer the plum juice to a small saucepan and stir over medium heat, simmering until syrupy, 3 to 5 minutes –take care, as it burns easily. Spoon the syrup over the plums before serving.
6. Edna suggests a ring of whipped cream inside the rim of the tart as an optional decoration, or one can add vanilla ice cream on top.

Edna Lewis was born and raised in a small Virginia farming community where she developed early on a deep love for the products of the field and orchard -- the gifts of nuts and berries hidden in the woodlands, the savory pleasures of wild game, and the taste of farm-bred fowl and livestock.
The Edna Lewis Cookbook (1972), written with Evangeline Peterson, contains over 100 recipes, arranged in menu form and organized by seasons of the year. Combining her lifelong knowledge of southern American cookery with the sophistication, delicacy, and mastery of French cuisine, it blends hearty American fare with elegant continental food. (Photograph by John T. Hill)
With Scott Peacock, she wrote The Gift of Southern Cooking: Recipes and Revelations from Two Great American Cooks (Alfred A. Knopf, 2003). That is where I found this recipe for Angel Food Cake, with its irresistible lightness of being.
Angel Food Cake
Time: I hour
Yield: 10 servings
Ingredients:
1 cup cake flour
1 1/2 cups sugar
12 large egg whites at room temperature
1/2 teaspoon cream of tartar
1/2 teaspoon salt
1 1/2 teaspoons vanilla extract
Steps:
1. Heat oven to 375 degrees. Combine flour and 3/4 cup sugar (this is half the required sugar) and sift twice onto wax paper or a plate. Set aside.
2. Put egg whites into a large mixing bowl and beat on low speed until frothy. Add cream of tartar, salt, vanilla, and 1 tablespoon water. Continue beating, gradually increasing speed until egg whites begin to increase in volume. Springle remaining 3/4 cup sugar over whites 1/4 at a time, and beat until incorporated. Do not overbeat. Egg whites should be just firm enough to form soft peaks.
3. Sift 1/4 of the reserved flour and sugar mixture over beaten whites and fold in. Repeat until entire mixture has been added, making sure each addition is fully incorporated into whites before adding more.
4. Spoon batter into an ungreased 10" tube pan. Use a long spatula or butter knife to draw a deep line through center of batter following circumference of pan; this will release any large pockets of air.
5. Bake 35 to 40 minutes or until cake is golden brown and springs back to the touch. Remove from oven and invert onto a plate; cool completely in pan. When cooled, use a long straight-edged spatula to loosen cake from sides of pan. Store tightly covered.
***
Tarte Tatin
(adapted from Susan Spungen, "Susan's Kitchen," Hampton Cottages and Gardens (HGC), October 2020, page 82)

Originating in France, this tart is named after the Tatin sisters who invented it and served it in their hotel as the signature dish. The pastry is traditionally associated with apples, but other fruits may be used. The apples are caramelized in butter and sugar before the tart is baked. It is a perfect dessert for the fall when apples are at their best.
Serves 8
Ingredients:
7 large Gala apples (or other firm, crisp, seasonal apples that will hold their shape while cooking such as Granny Smith)
1/2 lemon
4 tablespoon cold unsalted butter, cut into pieces
3/4 cup granulated sugar
1 12"-round, chilled pie dough or puff pastry
crème fraîche, for serving
Instructions:
1. Preheat the oven to 400° F. Peel the apples and cut them into thirds off the core, then cut out any remaining seeds. Put them into a bowl and squeeze the lemon half over the pieces. Set aside.
2. Have the butter pieces ready by the stove. Add the sugar to a large (12") heavy-bottomed skillet and place over medium-high heat. Cook without stirring until sugar begins to liquify, 2-4 minutes. 3. When the sugar melts further and begins to brown, reduce heat slightly and give it one good stir with a whisk to get rid of any clumps, then don't stir again. Swirl the pan gently until the sugar is dark amber, 5-8 minutes total. This process must be done carefully to avoid burning the sugar. 4. Remove from heat, then carefully add the butter pieces and swirl until they melt. 5. Return skillet to the burner, add the apples and scraped vanilla seeds and pod, and cook over medium-high heat, gently stirring and turning the apples until they soften and start to turn translucent at the edges, about 10 minutes. Remove from the heat and cool slightly. Take out the vanilla pod. (It can be saved for another use.) 6. Using tongs, transfer apples rounded side down to a smaller (10") pan with an oven-proof handle or to a 10" pie plate. Arrange the apple pieces in a concentric circle around the outside, overlapping them quite a bit. Arrange remaining pieces in the center of the ring. 7. Top the apples with the pastry round, trim (if necessary) so that you have about 1" overhang all the way around, and tuck in the edges. Cut a few vents in the center and place pan on a baking sheet. 8. Bake for 25-30 minutes, or until pastry is nicely browned and apples are bubbling around the edges. 9. Run a butter knife around the perimeter to loosen the tart and let it cool, preferably 30 minutes, until you are ready to serve. If it has cooled completely, either return it to the oven to warm it up or place it over low heat for a few minutes to melt the caramel again. 10. To invert, top with a serving plate, grasp the pan and plate tightly together (wearing oven mitts if the pan is still warm), and flip. Remove the pan. If any apples stick to the pan, just reposition them on the tart. 11. Serve warm with crème fraîche, if desired.
***
Tomato Pies
(contributed by Caroline Oliver, from the kitchen of Jon Morris)
This recipe is just in time for the summer tomato season -- whether you're growing your own plants or buying heirloom and juicy varieties from farmers' markets. I grew up in New Jersey and nothing tops a Jersey tomato.

The other day someone asked me why I say "toe-mah-toe" -- with a short "a" -- and not "toe-may-toe" -- with a long "a." I said I think it has to do with my English heritage (and my mother wanting us to speak "the king's English). But the pronunciation is also closer to the French word for the fruit, "tomates" ("toe-mat"), and there's a bit of French Huguenot in me as well.

I had never heard of Duke's mayonnaise. It is a condiment created by Eugenia Duke in Greenville, South Carolina, in 1917. Early in its history its popularity was largely limited to the South. Today it is a key ingredient in countless regional delicacies, and chefs across the nation declare Duke's to be the only mayonnaise fit for their kitchens. It contains more egg yokes than other varieties of mayonnaise and no added sugar. Today it is the third largest mayonnaise brand after Hellman's and Kraft.

The recipe makes two pies (one for you and one to share) and is unbelievably tasty. It's even better the next day!
Prep time: 15-30 minutes, plus 1 hour or
more to let the salted, cut tomatoes sit
Cook time: 30-40 minutes Serves 4-6 people
Ingredients:
2 9-inch frozen pie shells
1 large vidalia onion 7-8 tomatoes (about 3 pounds), mixed variety if possible Kosher salt Butter Fresh basil (about 15 leaves) 2 cups shredded mozzarella cheese 2 cups shredded pepper jack cheese (use cheddar as alternate) 1 cup Duke's mayonnaise 1 tablespoon Sirachi or hot sauce Fresh ground pepper
Instructions:
1. Slice tomatoes into 1/4 - 1/2 inch slices. Lay tomatoes out on cooling rack or sheet pan, then generously salt and pepper. (This sweats the tomatoes so make sure every tomato gets a good pinch of salt!) Let tomatoes sit out for at least an hour (or longer). You can flip partway through and add a little more salt.
2. Dice tomatoes and put in a colander, stirring occasionally while you complete the next steps.
3. Preheat oven to 350 degrees. Pull out pie shells to start thawing. Pre-bake pie shells for about 10-12 minutes. 4. Chop onions and sauté in butter and salt until browned. Then thinly slice basil leaves.
5. Evenly layer the bottom of each pie shell with onions, then tomatoes, and lastly basil.
6. Mix together cheeses, mayonnaise, and Sirachi or hot sauce. Place dollops around each pie and spread to cover.
7. Bake pies at 350 degrees on sheet pan for 30-40 minutes. After cooking let pies rest. (I prefer overnight.)
8. Reheat at 300 degrees for 20 minutes or microwave slices for about 30 seconds.

This recipe was contributed by Caroline Oliver, a colleague of Jon Morris, the recipe-writer. An investment advisor and portfolio manager at Palladium (Registered Investment Advisers) in Norfolk, Virginia, Caroline loves to cook but admitted that she doesn't have a green (or red) thumb for growing tomatoes. After receiving her undergraduate degree, she studied at the University of Strasbourg in France and obtained an MBA from Old Dominion University. Caroline also serves on a number of boards in her community, among them Lake Taylor Transitional Care Hospital Foundation and Norfolk Botanical Garden.
***
Lemon Lavender Avocado Loaf
(from Allrecipes.com, submitted by Sheena)

What could be better than a summer bread that combines lemon, lavender and avocado? On the North Fork we are blessed not only by the Long Island Wine Country, but by a lavender farm in East Marion. At Lavender by the Bay you can pick your own lavender or buy fresh-cut or dried bunches as well as varieties of lavender plants. Culinary lavender is available along with lavender teas and lavender honey, though the honey season is short.
Prep time: 20 minutes
Cook time: 1 hour

Ingredients:
2 2/3 cups all-purpose flour
1 1/2 teaspoons baking soda
1 teaspoon baking powder
3/4 teaspoon salt
1/2 cup butter, softened
1 3/4 cups white sugar
3 eggs, at room temperature
1 1/2 cups mashed avocado (about 3)
2 tablespoons lemon juice
3/4 cup milk
2 tablespoons dried lavender
1 tablespoon grated lemon zest
Directions:
1. Preheat oven to 350 degrees F (175 degrees C). Grease and flour 2 9"x5" loaf pans.
2. Mix flour, baking soda, baking powder, and salt in a bowl. Set aside.
3. Beat the butter and sugar with an electric mixer in a large bowl until light and fluffy. The mixture should be noticeably lighter in color.
4. Add eggs one at a time, allowing each egg to blend into the butter mixture. Beat in the avocado and lemon juice with the last egg.
5. Pour in the flour mixture alternately with the milk, mixing until just incorporated.
6. Fold in the lavender and lemon zest, mixing just enough to evenly combine. Pour the batter into prepared pans.
7. Bake in the preheated oven until a toothpick inserted into the center comes out clean, about 1 hour. Cool the pans for 10 minutes before removing to cool completely on a wire rack.

Lavender by the Bay
7540 Main Road
East Marion, NY 11939
T: 631-477-1019
www.lavenderbythebay.com
A must reference when using lavender in baking and cooking:

***
Ruby Robey's Strawberry Shortcake
(Charity Robey, The Shelter Island Reporter, July 2, 2020,
and adapted by Rafael Torres)

This recipe was published in time for the Fourth of July holiday weekend when strawberries are in season. With the heat and rain this spring, strawberry season was short, but if you don't mind using store-bought berries like Driscoll's, you're still in luck. A true shortcake is crumbly and flaky, not elastic, and definitely not spongy, according to Charity Robey's grandmother. It should also have the taste and consistency of a slightly sweetened baking soda biscuit. Once you put the sugar on the berries, they create syrup, and a copious amount of the sweet nectar is another key to a good shortcake. It should be allowed to soak into the cake, flavoring it. The whipped cream should go on at the last minute, then decorated with the extra strawberries. (Photo: Charity Robey)

When I made the shortbread dough and divided it into eight parts, the cakes were 1" high by 2 1/2" in diameter, not the 2" x 4" mentioned in this recipe. I then decided not to cut the baked cakes in half or butter them. A friend, Rafael (Ralph) Torres, who's a cook at Sophie's Rest in Southold on the North Fork of Long Island, suggested putting the whipped cream on top of the cakes first -- as a foundation to hold the strawberries and syrup but also to showcase the white-and-red colors. He then added confectioner's sugar as a whimsical accent to each cake to complete the white-red-white theme.
Serves 8, either as one cake or as 8 individual cakes
Berries: 1 quart fresh strawberries, about 3 cups when hulled and sliced 1/4 cup sugar
Cake: 2 cups all-purposed or self-rising flour 3 teaspoons baking powder 1/4 cup sugar 1/2 teaspoon salt 1/2 cup shortening 1 egg 1/3 cup plus 1 tablespoon milk 2 tablespoons butter
Whipped cream: 1/2 pint cold heavy cream 1 tablespoon sugar
Instructions:
1. Put the hulled and sliced strawberries in a bowl, reserving one nice berry to garnish each serving. Add 1/4 cup sugar (or more if the berries are tart) and mix to coat the berries. Set them aside for at least an hour while you prepare the cake.
2. Heat the oven to 425 degrees. Grease an 8-inch cake pan, or two cookie pans if you are making 8 individual cakes. 3. Mix the flour, baking powder, sugar, and salt in a medium mixing bowl. Cut in the shortening with two knives or a pastry blender until the mixture feels like coarse sand. 4. In a small bowl, mix the egg with a fork and add the milk. Add the milk mixture to the flour mixture and stir just until the dough forms a rough ball. It's fine if there are crumbs falling off, or if the dough does not form a neat ball. Don't overmix it! 5. Gently press the dough into an 8" lightly-greased cake pan, or if you are making individual cakes, divide the dough into 8 parts and gently press each into a circle about 2 inches high and 4 inches across on your prepared cookie pan, leaving at least two inches between each cake. 6. Bake at 425 degrees for 8-10 minutes for the individual cakes or 15-20 for one 8-inch cake. They are done when they are very light brown. 7. Cool for 15 minutes on a wire rack, split horizontally while still warm, and butter each cut side. 8. Spoon half of the strawberries and their syrup onto the bottom half. Replace the top and spoon the rest of the strawberry mixture onto the top. 9. Whip the cream with a hand mixer until it starts to thicken, add a tablespoon of sugar and continue to whip until soft peaks form. Spoon the whipped cream on top of the cake(s) and garnish with the reserved strawberries.
Sweet Rafael ("Ralph") Torres divides his time between cooking at the restaurant Sophie's Rest in Southold on the North Fork of Long Island -- known for its prime rib Tuesdays -- and working in his family business, Juan Chavez Painting and Staining, based in Orient, New York.


***
Croissants aux Amandes
(David Lebovitz, L'Appart, pages 95-97)

"The French are a frugal lot, which is one reason I fit right in," writes David Lebovitz in his book about buying and renovating an apartment in Paris. "I hate throwing things away, especially anything edible. Bakeries do their part, too, giving a second life to leftover croissants by stuffing them with a velvety smear of rich frangipane (almond cream) and baking them again. I've often warned visitors not to try them, because once you do, you are on a slippery slope and will always crave them."
These can be made with frozen or good-quality, store-bought croissants. If your croissants are larger than the normal ones, you may want to double the frangipane filling and the syrup. Extra frangipane can be frozen for your next batch. For a sweeter syrup, you can add 2 more tablespoons of sugar to it.
I used mini-croissants and smothered the top of them with frangipane. In baking, the frangipane melted, making one of my creations look like a humped zébu cow from Madagascar (in the top of the photo) while the other resembled a piglet (in the bottom). Don't be deceived, even though Andre Agassi once said, "Image is everything!"
Frangipane 1/2 cup (50g) almond flour (also called ground almonds) 1/4 cup (50g) sugar 1 large egg, at room temperature 3 1/2 tablespoons (50g) unsalted butter, at room temperature A few drops of pure almond extract Pinch of salt
Syrup 1/2 cup (125 ml) water 1/4 cup (50g) sugar 2 tablespoons dark rum, amaretto, or kirsch (optional)
4 croissants, preferably day-old 4 tablespoons (20g) sliced almonds Powdered sugar
Steps: 1. Preheat the oven to 375℉ (190ºC). Line a baking sheet with parchment paper or a silicone baking mat. 2. Make the frangipane: In the bowl of a stand mixer fitted with the paddle attachment, beat the almond flour, sugar, egg, butter, almond extract, and salt on low speed until combined. Turn the speed to high and beat the almond cream for 3 minutes, until very light and fluffy. (You can also beat it by hand in a bowl with a wooden spoon or flexible silicone spatula.) 3. Make the syrup: In a small saucepan, heat the water and sugar until it comes to a boil. Sir to dissolve the sugar, remove from the heat, and add the liquor. 4. Starting at one side, slice each croissant in half horizontally, stopping just before you reach the other side, leaving it closed as a hinge. Brush the inside of each croissant liberally with the syrup on both sides, making sure each side is completely saturated. It may seem like a lot, but the finished croissants benefit from the moisture. 5. Smear the inside of each croissant with 2 tablespoons of the frangipane. Put them on the prepared baking sheet and press each down firmly. Divide the remaining frangipane and smear it over the top of each croissant. Sprinkle each croissant with 1 tablespoon of the sliced almonds, then bake until the tops are golden brown, about 15 minutes. Let cool a few minutes, then sprinkle with powdered sugar.
Et voilà...
Serving and storage: The almond-filled croissants are best served the same day they are made, either warm or at room temperature, but they can be kept in an airtight container overnight.
To the left below is David Lebovitz leading a class on making croissants aux amandes at the kitchen shop Sur La Table on November 8, 2017 in New York City. To the right are copies of his book L'Appart which had just been published the day before by Crown Publishing Group, a subsidiary of Penguin Random House.


***
A Salad-Hater's Favorite Salad -- Baby Spinach with Pignoli Nuts and Pears
(contributed by Dawn Heard, Peconic, NY)

This is a very easy salad to put together and also delicious, with different textures -- crunchy and soft -- and a savory and sweet taste. It can be made for just one person or serve a group by adjusting the quantity of ingredients.
Why Bosc pears? Bosc pears have a more firm, dense flesh than other pear varieties. They are ideal for baking, broiling or poaching as they retain their shape and texture. Their flavor is also less likely to be overwhelmed by the use of strong spices, with their own complex flavor of honey sweetness and juiciness. Plus they are unique for their color -- a warm, cinnamon brown with russeting over the surface of the skin which will "dress up" this salad with pleasing colors. Need I say more?
Time: 15 minutes
Yield: depends upon the quantity you desire
Ingredients:
baby spinach
pignoli nuts
Bosc pears
olive oil
Balsamic vinegar
lemon juice
salt and pepper
Instructions:
1. Fill a bowl full of baby spinach. 2. Put pignoli nuts into a frying pan with a nice amount of olive oil and brown. (I use about 1 oz of nuts per generous serving.)
3. Pour the nuts and oil over the spinach. (The spinach will melt a bit.) 4. Pour a bit of Balsamic vinegar into the same pan and add a squeeze of lemon juice.
5. Cube the Bosc pear(s) after cutting out the center core, stir them into the Balsamic vinegar, and sauté slightly until soft. (I use 1 Bosc pear per generous serving)
6. Pour the pear and vinegar over the salad.
7. Salt and pepper to taste and toss.
8. You can also add crumbled feta, thinly sliced raw asparagus, or finely chopped prosciutto.


***
Grilled Brie and Pear Sandwich
(from www.mamasgottabake.com/2013/10/grilled-brie-and-pear-sandwich/, adapted and elaborated on by Ellen)

"Do not let the peasant know how good cheese is with pears" goes the old saying. Intrigued with these words and their portent, Massimo Montanari, a food historian from Italy, unravels their origin in his book, "Cheese, Pears and History in a Proverb" (Columbia University Press, 2010). At first cheese and its visceral, earthy pleasures were treated as the food of Polyphemus, the uncivilized man-beast. Pear, on the other hand, became the symbol of ephemeral, luxuriant pleasure-and-indulgence of the social elite. Joined together they took on an exclusive savoir faire as taste evolved into a cultural attitude.
Pear and brie are a perfect combination. With arugula and pecans, it's buttery, creamy, sweet and crunchy. This makes for a delicious sandwich break in the middle of the day.
Time: 15 minutes
Servings: makes 2 darn good sandwiches
Ingredients:
4 slices of bread, such as a hearty multi-grain variety
1 firm, ripe pear (I chose Bosc)
small wedge of brie, cut into 1/8" slices
handful of fresh arugula handful of toasted pecans (if you want to make them especially tasty, roast or caramelize the pecan halves in butter with light-brown sugar)
1/2 stick butter, at room temperature
salt and pepper, if desired, or other spices or herbs of your choice
Instructions:
1. Cut the pear in quarters and with a sharp knife cut out the core and seeds, then cut each quarter into thin slices. (The recipe calls for using a mandoline on a larger setting and slicing the whole pear before cutting out the core and seeds, but this method is not necessary.)
2. Butter the four slices of bread making sure you cover every square inch of bread with butter to insure perfect toastiness.
3. Layer a bread slice with the arugula and pecans, several pear slices, and the brie. Then place the second bread slice on top. Repeat this step for the other two pieces of bread. Make sure the buttered slices are on the outside!
4. Heat a cast iron skillet to medium and place the two sandwiches in the pan. Let the sandwiches get a nice sear on them, then cover the pan with a lid to allow the cheese to melt better. When the sandwich is golden on the first side, flip it over until it browns on the other side.
If you can't get enough of these scrumptious pears, slice some up (with or without a mandoline on a thinner setting), and make some pear chips to serve along with the sandwiches. However, to really savor the loveliness of the fruit, one should just eat it in its natural state!
Pear Chips
(from Martha Stewart)
The recipe calls for firm, underripe pears. Very thinly slice pears lengthwise with a mandoline or chef's knife and place in a single layer on parchment-lined baking sheets. Bake in a preheated 225 degrees oven 1 1/2 hours. Flip slices and continue baking until darkened slightly and edges have curled (they should still be pliable), 1 to 1 1/2 hours. Transfer to a wire rack and let stand until cool and crisp. Store at room temperature in an airtight container up to 1 week.
***
Artichoke Tapenade
(from David Lebovitz, www.davidlebovitz.com)
Everything David Lebovitz touches seems to turn to gold ... or a light olive green in this case. A professional cook and baker for most of his life, he spent over a decade at Alice Water's Chez Panisse in Berkeley. He left the restaurant business in 1999 to pursue a career in writing; and in 2004 he moved to Paris, writing about the delights and disasters of making the City of Light his home in L'Appart (2017). He is the author of numerous books, among them: My Paris Kitchen (2014), The Perfect Scoop (2018), The Sweet Life in Paris: Delicious Adventures in the World's Glorious -- Perplexing -- City (2011), and The Great Book of Chocolate (2004). He has turned his website, www.davidlebovitz.com, into one of the first and most popular food and living blogs.

This recipe for artichoke tapenade is so simple to make and doesn’t require pitting an endless amount of olives like regular tapenade. David reminds us that the name tapenade comes from the word in Provençal for capers, tapéno? So you can’t have tapenade without capers. You shouldn't have any trouble finding them in a jar, though recently my grocery store was out of them. Be sure to rinse and squeeze them dry to remove the unpleasant taste of the brine. You can buy the olives in specialty markets and then pit them. To pit the olives, David suggests pressing them with your thumb, "being careful to stay out of the way of any squirts of oil, then pluck out the pits." He rinses them also if they're conserved in a heavily flavored brine. Those who are less adventurous can buy standard pitted green olives without pimentos in a jar. They work well in this recipe, too.
Serves 8-10 as an appetizer
Ingredients:
2 garlic cloves, peeled and minced 1 cup (4 ounce, 120 g) pitted green olives
1 tablespoon (10 g) capers
8-10 (14 ounces, or 250 g) canned artichokes, drained well and quartered
1 tablespoon freshly squeezed lemon juice
6 tablespoons (90 ml) extra-virgin olive oil
1/8 teaspoon chile powder
salt to taste
Instructions:
1. In the bowl of a food processor, pulse the garlic, olives, capers, artichoke hearts, lemon juice, and olive oil until almost smooth, but still chunky.
2. Taste, and add salt, chile powder, and additional lemon juice, if desired.
3. Serve with toasted slices of baguette or crackers.
Storage: The tapenade will keep for up to one week in the refrigerator.
***
One Bowl Yellow Cake (from Melissa Clark, New York Times, May 22, 2020)

"My recipe is a classic yellow cake that's whisked in one bowl. It is slightly fussier than other one-bowl cakes in that you'll definitely need that whisk, and a dedication to some brief but furious mixing. But the result is a cake that's fantastically silky, tender and buttery without being at all heavy -- and without calling for an electric mixer," writes Melissa Clark.
Time: 1 hour
Yield: 1 two-layer cake, one single-layer, thick cake, or 24 cupcakes
Ingredients:
3 eggs at room temperature
1 1/4 cups/250 grams of granulated sugar
4 tbs/60 grams of unsalted butter (equals one-half a stick of butter), melted
1/2 cup/120 milliliters of flavorless oil (such as sunflower, safflower, canola oil)
1 cup/240 milliliters of buttermilk or combination of yogurt or sour cream thinned with milk
citrus zest
lemon or orange extract
vanilla extract
almond extract
shot of bourbon
1/2 tsp salt
1/2 tsp baking soda
2 tsps baking powder
2 cups all-purpose flour or cake flour
Instructions:
1. Heat oven to 350 degrees.
2. Melt 4 tbs unsalted butter and let it cool.
3. Crack eggs into a large bowl, add sugar and whisk the heck out of it. You want the mixture to be frothy and bubbly, but you don't need it to look like mousse or to "ribbon" on itself, it just has to inflate slightly. This helps give you a nice light crumb.
4. Whisk in the butter, flavorless oil, and the buttermilk (or yogurt or sour cream thinned with some milk).
5. Add flavorings: citrus zest, lemon or orange extract, vanilla extract, almond extract, shot of bourbon. You can experiment with the flavorings you use.
6. Whisk in salt, baking soda and baking powder.
7. Finally whisk in flour. Whisk vigorously for another 30 seconds to eliminate any lumps.
8. Pour the batter into greased and parchment-lined (or floured) pans. You can use two 8-inch layer cake pans (bake for 30-35 minutes); a 9x13-inch pan (25-35 minutes); or 24 cupcake molds (use liners and bake for 17-22 minutes). Depending upon the pan(s) you use, the baking time will vary.
9. The batter rises a lot. The cake is done when it's golden and the top springs back when lightly pressed in the center.
10. Once cooled, you can frost it as you like -- whipped cream with fruit, chocolate frosting, or satiny buttercream.
For the frosting, you can use whipped cream and strawberries or other fruits, chocolate frosting, or satiny buttercream. I chose to make a chocolate fudge icing and then decorate the cake with banana slices. I prefer this icing to chocolate buttercream frosting because it never hardens, but stays creamy and fudgy.
Chocolate Fudge Icing (without powdered sugar)
Ingredients:
1 cup of granulated sugar
3-4 squares of chocolate (you can substitute cocoa if you don't have squares)
1 egg
1 tsp vanilla
2 tbs butter
1/4 tsp salt
2 cups milk
Instructions:
1. Put sugar, salt, egg and 1/4 cup milk into a medium-sized pan and beat until well-blended.
2. Add chocolate, butter and rest of milk. Cook over medium heat until dark and thick.
3. Add vanilla and cool to spread on the two layers of the cake or on top of the cupcakes.
***
May Daisy Cocktail
(from David Lebovitz, "Drinking French," adapted from The PDT Cocktail Book by Jim Meehan, recipe by Phil Ward, photo courtesy of Bill Slack)

It's May. Think lily-of-the-valley, or "muguet," the flower presented as a symbol of good luck to friends and colleagues on May 1st for the "Fête du Travail" (Labor Day) in France. Or think mint juleps and the Kentucky Derby. Yet in these uncertain and challenging times, national and local events have been significantly altered, postponed, or canceled altogether. But we can still drink! Wine and spirit stores are considered "essential businesses" and during the lockdown have remained open so that our bars and wine cellars can always be replenished.
David Lebovitz's new cocktail book, "Drinking French" (Ten Speed Press, March 2020), couldn't have come at a better time. The "May Daisy Cocktail" gets its flavor from two iconic French spirits, cognac and Chartreuse. As David writes, "It's a very easy cocktail to make and a good dose of fresh fruit juice does make me feel hopeful about spring. A mint leaf reminds us that things are in bloom again, too." And, most importantly, it will refresh our spirits (ha!).

For 1 cocktail:
To make simple syrup, heat 1/2 cup (100g) sugar with 1/2 cup (125ml) water, stirring until the sugar is dissolved. Let cool and refrigerate until ready to use.
2 ounces cognac
1 ounce freshly squeezed lemon juice
3/4 ounce green Chartreuse
1/2 ounce simple syrup
fresh mint leaf or sprig
1. Add the cognac, lemon juice, Chartreuse, and simple syrup to a cocktail shaker. Fill two-thirds with ice, cover, and shake vigorously until well-chilled, about 15 seconds.
2. Strain into a chilled wine glass. Garnish with a fresh mint leaf or sprig.
***
Broiled North Fork Grass-Fed Beef Tri-Tip Steak for Two
(from the kitchen of Pat Mundus)

I'm not one who eats or cooks a lot of red meat so you can imagine how happy I was when Pat came up with this easy recipe for broiled steak for two. The beef comes from a farmer on the North Fork of Long Island whose cattle are grass-fed -- so "what's good for the goose is good for the gander."
Time: half an hour
Yield: 2 servings
Ingredients:
1 North Fork grass-fed (and raised in Cutchogue) beef tri-tip steak
Salt and pepper
1 Vidalia (or sweet) onion, quartered and sliced
2 cloves garlic, diced
1 box of multi-colored cherry tomatoes
A handful of fresh basil, diced
Instructions:
1. Line a broiling pan with foil while the broiler pre-heats on "high" setting.
2. Place a generously salt-and-peppered tri-tip steak in the middle of the broiler pan. Toss chopped garlic, onions and multi-colored cherry tomatoes in olive oil and add to the broiler pan, clustered tightly all around the steak. 3. Broil four minutes on one side on the high rack. Flip the steak. Add the diced basil on top of the tomatoes and onions and toss well. Broil another four minutes or until the steak is cooked as desired. Note: If you press your thumb into the meat and your thumbprint doesn't spring back, it's rare. If your thumbprint springs back slowly, it's medium. If your thumb doesn't even make a print, you're too late. It's well-done!
4. Remove the steak and allow it to rest for ten minutes. Toss the tomatoes and onions again and either broil a bit more or remove. A little bit of char is OK, but do not burn and ensure the tomatoes don't get too soft. 5. Place a bed of tomatoes and onions on each plate. 6. Carve the steak into cross-grain slices and place them on the beds of tomatoes. Drizzle any cutting board juices on top and serve immediately with a green salad and some velvety red wine.


Pat Mundus is a retired ships' officer who lives in Greenport, New York. An avid sailor and lover of good food, she marvels about living in a seaport surrounded by farms and vineyards. "It's the best of all worlds!"
Visit: Eastendcharters.com for Pat's classic yacht day charters sailing from Greenport.
***
Big Bill's Tomato Chutney
(from the kitchen of Bill Slack)

This chutney will be a welcome addition to your table, decorative and delicious. It can accompany fish or fowl and is especially good with grilled salmon. All ingredients are readily available, and it is very easy to make. It will serve 20 people, once we begin to have dinner parties again!

Ingredients:
2 cups sugar
2 2/3 cups cider vinegar
2 tablespoons minced, peeled ginger root
2 teaspoons salt
1 1/2 teaspoons coriander seeds, crushed
1/2 teaspoon dried hot red pepper flakes
3 lbs ripe plum tomatoes, chopped*
3 onions, chopped
1 cup golden raisins
* Bill refrigerates the tomatoes first to make them firm before slicing. You can also peel and seed them if you wish.
Instructions:
1. In a heavy pan combine sugar, vinegar, ginger root, salt, coriander, red pepper flakes, and bring to a boil to dissolve the sugar.
2. Add tomatoes, onions and raisins.
3. Simmer 1 1/4 hours.
Chill and serve.

Bill sent this image -- the Jade Death Mask of K'inich Janaab' Pakal ("Pacal the Great"), Mayan King of the city-state of Palenque. He ascended to the throne in 615 at age 12 and ruled for 68 years until his death in 683. He is one of the longest ruling monarchs in history.
The mask is from the Late Classic period in pre-Columbian Mesoamerica. It is in the collection of the Museo Nacional de Antropología in Mexico City, Mexico.

Now retired and living in San Diego, with visits to Lake Titus in the Adirondacks (pictured here) in the summer, Bill ran special events and public relations at Brown University in Providence, RI.
***
Pizza Pizza Pizza (from the kitchen of Meera Thompson, adapted from the Food Processor Bread Book by the Editors of Consumer Guide)
In these times of quarantine, many of the only restaurants that have remained open are pizzerias -- for pick-up or delivery. Every night in Brooklyn I see Hispanic workers on motorized bikes risking their health and safety to bring us pizzas in red square, insulated delivery bags. These front-line employees deserve our thanks and larger tips than normal in these times that are anything but that.

For those desirous of making pizza for the first time, here is a recipe from my friend, Meera, an artist -- transcribed with comments in her own voice. A friend of hers was having trouble finding dough for thin crust pizzas, and this is the recipe she sent her. "I love making pizza dough because it is forgiving," Meera wrote. "Sometimes I have to add a little more flour or a little more water to make the dough form into a ball. No matter what it always works. This makes two (14-inch) thin crusts. I have round pizza pans that have holes in the bottom to let the air circulate in the oven, but before I bought those, I used a standard rectangular cookie sheet to make one pizza. I roll the dough out on a generously floured pastry cloth, but just putting flour on the kitchen counter works, too. (Wear an apron!)"
Time: 45 minutes to an hour (to prepare the dough and roll it out) and 11 minutes to cook
Yield: 6-8 slices
Ingredients:
1 teaspoon salt
1 teaspoon sugar
1 tablespoon olive oil 1 package (1/4 oz) of instant yeast (preferably Dr. Oestker yeast levure)
2 1/2 cups of flour (and additional flour for rolling the dough) 1 teaspoon freshly ground black pepper (optional)
1 teaspoon dried rosemary (optional)
1 cup lukewarm water
Your favorite sauces and toppings (I like tomato sauce, mushrooms, sausages and mozzarella. But I have also made "white pizzas" with just sautéed onions and parmesan.)
Instructions:
1. Put the pre-measured salt, sugar, olive oil, yeast and flour into the beaker of the Cuisinart. Pulse for a few seconds to combine. (I also add 1 teaspoon of freshly ground black pepper and 1 teaspoon of dried rosemary, but those are optional flourishes.) 2. With the motor running, slowly drizzle about 1 cup of lukewarm water down into the feed tube. Gradually a ball of dough will form. Let it spin around the beaker for 25 rotations. (It will not be perfect. Only God is perfect.)
3. Let the dough sit in the beaker for 2 minutes. Then turn the processor on and let the dough spin for another 10 rotations. The dough may not have formed into a ball at this point. So you might have to add a tiny bit more water or flour and spin again. Stay calm. It will work eventually. Enjoy a glass of wine. 4. Turn off the processor. Measure 1 tablespoon of olive oil into a large bowl. Rub the oil around to coat the inside of the bowl and then with your oily fingers grab the dough out of the Cuisinart and plop it into the bowl. Cover the bowl with aluminum foil and let the dough rise for at least 30 minutes.
5. Roll the dough out on a floured surface and fit it into the greased pan or pans. Let sit for 10 minutes before you fill them with your favorite sauces and toppings.
6. Bake the pizza in a preheated 500 degrees oven for 11 minutes, but the original recipe called for the oven to be set at 425 degrees and the baking time to last between 15 and 20 minutes.
Et voilà!


An artist, Meera Thompson is an Adjunct Instructor at the School of Professional Studies at New York University.
You can check out her website: www.meerathompson.com;
and her Instagram is: meera.thompson.art. She shows her paintings at Atlantic Gallery, 548 W 28th Street, Chelsea, in New York City.
***
Thai Shrimp Coconut Soup with Shitakes and Lemongrass
(from the kitchen of Loran Thompson)

This recipe calls for some unusual ingredients which can be found in Asian markets or vegetable-and-fruit grocery stores which carry speciality produce.
Lemongrass is a tropical island plant in the grass family which is cultivated as culinary and medicinal herbs as well as for its essential oils -- due to its scent resembling that of lemons. The plant's stalks are used in cooking.


Photos: The lemongrass plant (to the left) and the stalks as sold in a market (below).
Galangal is a tropical rhizome, a modified subterranean plant stem that sends out roots and shoots from its nodes. It is used in traditional Asian cuisines. While all varieties of galangal are closely related to common ginger and have a hot, spicy flavor, each is unique in its own way.
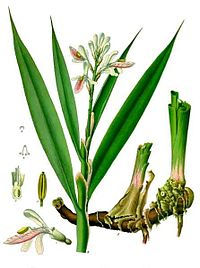

Photos: The galangal plant with rhizome (on the left) and the rhizome ready to be prepared for cooking (on the right).
Time: 1 hour (preparation and cooking)
Yield: 2 servings
Ingredients:
2 stalks lemongrass (tough outer leaves removed), sliced down the bias and cut into 1" pieces
4 pieces of dried galangal (available in small jars online)
2 large jalapeños (including seeds), stems removed, cut into 1" pieces
2 limes
3 cups chicken or fish stock
1 package of fresh sliced shitake mushrooms (about 1 cup)
3 tablespoons of Thai nam pla or Vietnamese nuoc nam (fish sauce, available in some stores or online)
1 lb. cleaned small shrimp, tails removed
1 can unsweetened coconut milk (about 15 oz.)
1/4 cup chopped cilantro
Instructions:
1. Peel both limes, and cut lime peel into 1" pieces. Squeeze the peeled limes and set the juice aside.
2. In a pot, combine the stock, lime peel, lemongrass, galangal, jalapeños, and fish sauce. Bring to boil and then simmer 20 minutes.
3. Strain the stock, discarding the solids.
4. Add the shiitakes to the stock, and simmer 5 minutes.
5. Add the coconut milk and shrimp to the pot, and simmer 4 minutes until shrimp are just cooked.
6. Remove from heat, and add the juice of both limes and the chopped cilantro.
The soup is now ready to serve!


Loran on vacation with his wife Meera enjoying oysters in Tasmania. They love all kinds of shellfish, whether raw or cooked. Claude Levi-Strauss, the Belgian-born French anthropologist, would approve!
***
Creamy Braised White Beans
(from Ali Slagle, New York Times, March 18, 2020)

Whether you don't eat meat, are trying to eat less meat, or you just don't have any around, this bean soup, far from being boring, is very satisfying. It is creamy and has a sweet taste depending upon the spices you cook with and the toppings you add. You can use canned beans or soak and simmer dried beans if you prefer. An added bonus: the garlic (pictured here), cooked with its skin on in the preparation of the soup, is later taken out and the cloves removed from the skins so that you can spread it on bread or toast to accompany the meal.
Time: 25 minutes
Yield: 4 servings
Ingredients:
1 tablespoon unsalted butter
1 head garlic, halved crosswise
1 cup whole milk
1 (15-ounce) can chickpeas, with their liquid
1 (15-ounce) can white beans, such as cannellini or Great Northern, drained and rinsed 1 thyme sprig, 2 sage leaves or 1 bay leaf
1/8 teaspoon ground nutmeg, allspice or garam masala
Kosher salt and black pepper
4 slices crusty bread or thick toast
Extra-virgin olive oil, for serving
Freshly grated Parmesan, for serving
Aleppo pepper or red-pepper flakes, for serving
Instructions:
1. In a medium saucepan, melt the butter over medium-high heat. Add the garlic, cut side down, and cook until golden brown, 1 to 2 minutes.
2. Add the milk, chickpeas and their liquid, white beans, and spices (I used a dried thyme sprig, bay leaf, and garam masala to be different) and stir to combine. Season generously with salt and pepper. When the mixture begins to bubble around the edges of the pan (you don't want it to come to a full boil), reduce the heat to low and let it simmer, stirring occasionally, until it has thickened and tastes great to you, about 15 minutes.
3. Use a fork to remove the garlic halves from the beans. Set aside until cool enough to handle, then use the fork to remove the cloves from the skins. Spread the cloves on bread or toast.
4. If you would like the beans to be more stew-like, mash some of the beans using a potato masher or the back of a spoon. Serve beans and milk in bowls. Garnish as you wish, with a drizzle of oil, a sprinkle of Parmesan and a pinch of Aleppo pepper and black pepper. Serve with the bread alongside for dipping.
Note: You can reheat leftovers the next day over low heat; the sauce will have thickened, but the beans will still be delicious.
***
Two Chicken Casserole Recipes
Chicken is a great meat to cook with. It is moderately priced and also very forgiving. Remember when Julia Child dropped the plucked roaster on her TV studio floor, picked it up, and continued to cook (and drink wine!) without missing a beat? For weeknight cooking either of these two recipes -- apricot chicken or sour cream-and- mushroom chicken -- is a great way to prepare something that's got a touch of homemade and is also simple to make. Neither requires a lot of prep time, and you can put the casserole in the oven to cook while you relax over cocktails. Use boneless, skinless chicken thighs or breasts, depending upon your preference for light or dark meat. Cube the chicken or leave in quarters to be covered with the sweet and savory sauce which gives the meal a wonderful flavor.
Apricot Chicken
(from the kitchen of Mary Yourch)


Time: 1 hour
Yield: 4 servings
Ingredients:
3 lbs boneless and skinless, chicken breasts and thighs
12 ounces apricot preserves
8 ounces Russian dressing (store-bought or you can make your own, see recipe below)
1 package (1 oz) of onion soup mix, such as Lipton 2 chicken bouillon cubes (if using Knorr) or 4 cubes (if using Herb Ox), optional

Instructions:
1. Preheat oven at 350 degrees.
2. Cube the chicken breasts and thighs, or you can just cut the breasts and thighs in half.
3. Mix together with a whisk the apricot preserves, Russian dressing, and dried onion soup mix in a large bowl. Add the chicken bouillon cubes if you like a more salty addition to the sweet and savory taste of the sauce.
4. Add the chicken to this mixture, then pour into a casserole dish and bake for 45 minutes.
5. When done, take out of the oven and serve over rice of your choice (basmati, jasmine, etc.).
Recipe for Russian Dressing
An alternative to store-bought Russian dressing is to make your own. This gives the meal a little freshness and a wonderful flavor. The recipe comes from Martha Stewart and is pretty simple. Its ingredients are what most of us already have in our pantry, spice drawer, and refrigerator. It yields 2/3 cup of dressing. (It can also be used as dressing in a Turkey Reuben.)
Ingredients:

1/2 cup mayonnaise
2 tablespoons ketchup
2 tablespoons pickle relish (I substituted chopped onions because I had no relish.)
2 tablespoons fresh lemon juice
1 teaspoon Worcestershire sauce
1/2 teaspoon coarse salt
1/4 teaspoon freshly ground pepper
Instructions:
Whisk all of the ingredients in a small bowl. Dressing can be covered and refrigerated for up to 1 week.
***
Sour Cream-and-Mushroom Chicken
(from the kitchen of Maggie Schnepel)

Time: 1 hour
Yield: 5-6 servings
Ingredients: 3 lbs of chicken, breasts and thighs
8 ounces (1 cup) sour cream
1 can of cream of mushroom soup, such as Campbell's

1/2 cup sherry
salt and pepper other seasonings to taste, such as tarragon.
Instructions:
1. Cut the chicken into quarters or smaller pieces, such 6 or 8.
2. In a frying pan, thoroughly brown the chicken in vegetable oil.
3. In a bowl, mix together the sour cream, mushroom soup, sherry, and seasonings.
4. Place the chicken in a buttered 9"x12" or round casserole dish and cover with the sour cream-and-mushroom mixture.
5. Cover the dish and cook in the oven for one hour at 350 degrees.
6. Serve on rice.

Mary and Gene Yourch are consummate boaters who have retired -- Mary as a school nurse and Gene from a legal practice in New York City and municipal administration in Rockville Centre, Long Island. They now live full-time in the maritime village of Greenport on the North Fork of Long Island with their kitty Princess.
***
Baked Steel-Cut Oats with Nut Butter
(Melissa Clark, New York Times Cooking, March 24, 2020)

This is a simple but filling breakfast with steel-cut oats and enriching ingredients. The beauty of baking the dish rather than cooking the oats on the stovetop is that while the oatmeal cooks for an hour, you can go do something else, and it doesn't take a lot of tending.
Time: 5 minutes to prepare, 1 hour to cook
Yield: 3-4 generous servings
Ingredients:
3 cups of boiling water
1 cup steel-cut or cracked oats
1/4 cup peanut butter or almond butter
big pinch of salt
some cinnamon or nutmeg
Instructions:
1. Heat oven to 350 degrees.
2. In a shallow casserole or baking dish, combine 3 cups boiling water and 1 cup oats.
3. Stir in 1/4 cup peanut or almond butter until somewhat smooth.
4. Season with a big pinch of salt and some cinnamon or nutmeg.
5. Cover with foil and bake for 1 hour, stirring halfway through, until the oats are cooked enough.
6. The oatmeal can be topped with cream or yogurt, dried cranberries or other dried fruit, even bananas, and walnuts, then drizzled with maple syrup, honey, or brown sugar. I find any leftovers can be stored in the refrigerator for the next day when you can reheat it on the stove with a little bit of water or use the microwave.

***
Made-in-the-Pan Chocolate Cake
(Margaux Laskey, New York Times, March 25, 2020, adapted from Mollie Katzen, "Honest Pretzels and 64 Other Amazing Recipes for Kids Who Love to Cook," Tricycle Press, 2009)

I'm an aficionada of chocolate and being cooped up in my home, I crave something sweet whether during the day or at night. This recipe is easier than the chocolate torte in one of my earlier blogs. Plus it can be made very easily by children when school is closed and parents are thinking of activities for the kids to do.
Time: 45 minutes
Yield: 9-12 servings
Ingredients:
1 1/4 cups/160 grams all-purpose flour
1 cup/200 grams granulated sugar
1/3 cup/30 grams unsweetened cocoa powder
3/4 teaspoon baking soda
1/2 teaspoon kosher salt
1/3 cup/80 milliliters canola or vegetable oil (melted Crisco works, also applesauce as a substitute if one doesn't have oil)
1 teaspoon vanilla extract
1 teaspoon apple cider vinegar or white vinegar
2 tablespoons semisweet or vegan chocolate chips (optional). You can also use cacao nibs.
Confectioners' sugar, for dusting on top (optional)
Instructions:
1. Heat oven to 325 degrees.
2. Add the flour, sugar, cocoa powder, baking soda, and salt to an 8x8 inch square glass or metal baking dish. Whisk the mixture together until uniform in color and the lumps are broken apart.
3. Add 1 cup water along with the oil, vanilla extract, and vinegar. Stir slowly with a fork or whisk in small circles to blend. Mash, scrape, and stir with a fork and spoon until the mixture becomes a smooth and uniform batter.
4. Scrape the sides of the baking dish with a rubber spatula and spread the batter in an even layer. Sprinkle with chocolate chips (optional). Use a damp paper towel to wipe the edges of the baking dish clean.
5. Carefully place the dish in the oven and bake for 28-33 minutes until a toothpick inserted into the center comes out mostly clean.
6. Remove from the oven, let cool, then cut the cake into squares. Dust the top with confectioners' sugar, if you like.

***
For those of you craving sweets but who have little experience with baking, this cookbook offers not only recipes but also instructions: "Rose's Baking Basics: 100 Essential Recipes, with More Than 600 Step-by-Step Photos" (Boston, New York: Houghton Mifflin Harcourt, 2018). Rose Levy Beranbaum is also the author of "The Cake Bible," "The Bread Bible," "The Baking Bible," "The Pie and Pastry Bible," "Rose's Heavenly Cakes," and for a change of pace, "Rose's Ice Cream Bliss." Maybe you've never thought of cooking as a religious experience, but Rose will help you find your inner bliss.

***
Split Pea Soup
(from "The Joy of Cooking," Irma Rombauer and Marion Rombauer Becker)

Nothing beats split pea soup for a nutritious meal that can be made from dried peas stored in your kitchen cupboard. The soup can be gussied up with a variety of your favorite spices or seasonings, sour cream and croutons on the top, or kept simple. The beauty of making this soup is that after preparing all the cut vegetables to add to the peas-and-water mixture, you're freed up to do something else while the soup simmers slowly for about 3 hours. Consider catching up on emails or phone calls, focusing on a project for work, doing the laundry, cleaning your home, reading a good book, or attending to your home-schooled kids. The soup can be cooked in the morning or afternoon, and voilà, it's ready for lunch or dinner, by itself or as a first course, and you've also spent a productive half day! And don't forget, you can easily freeze what remains for another time.
Time: 3 1/2 - 4 hours
Yield: about 8 cups
Ingredients:
2 cups of split peas (usually one bag of dried peas)
A turkey carcass, a ham bone, or a 2-inch cube of salt pork
1/2 cup chopped onions
1 cup chopped celery with leaves
1/2 cup chopped carrots
1 clove garlic
1 bay leaf
1 teaspoon sugar
A dash of cayenne pepper
1/4 teaspoon of thyme
Seasonings to taste
Croutons or sour black bread (optional)
To bind the soup (optional):
2 tablespoons butter or soup fat
2 tablespoons flour
Instructions:
1. Wash and soak 2 cups split peas. 2. Drain the peas, reserving the liquid. Add enough water to the reserved liquid to make 10 cups. Adding the peas to the water, cook covered for 2 1/2 - 3 hours with the turkey carcass, home bone, or salt pork. 3. Add the onions, celery, carrots (you can increase the amount of each) and simmer, covered for 30 minutes or longer until tender. Then add the garlic, bay leaf, sugar, cayenne, and thyme.
4. Remove the turkey, ham bone, or salt pork. Put the soup through a sieve. I use a foley food mill.
5. Chill, then remove the fat on the top. Depending upon the meat you use, the fat may be minimal, and this step can be skipped.
6. To bind the soup, the recipe suggests melting two tablespoons of butter or soup fat and then stirring in 2 tablespoons of flour until blended. Slowly add a little of the soup mixture. Cook and stir until it boils, then stir it into the rest of the reheated soup.
7. Season to taste and serve with croutons or other toppings.
***
Lentil Soup with Sausages
(Bonnie Tandy Leblanc, Bite of the Beast, April 1, 2020)

Now that we're on the subject of soups ... here's a simple and hearty soup that can simmer all day long or be ready in an hour. This soup tastes even better the next day. You can double or triple the recipe to stock your freezer with portion-size containers.
Time: 1 hour
Yield: 4 generous servings
Ingredients:
1 pound andouille, chorizo or Italian sausages, cut into small pieces, about 1/4" chunks
2 medium onions, minced (about 2 cups)
2-3 cloves of garlic, minced
1/2 pound lentils, picked over and rinsed (about 2 cups)
14.5 ounce can crushed (or another form) tomatoes
4 large carrots, peeled and cut into rounds
3 cups chicken stock or broth
2 cups water
1 teaspoon salt
1 teaspoon dried thyme or 1 tablespoon fresh
1/2 teaspoon black pepper, preferably freshly ground
fresh parsley, chopped (optional)
Instructions:
1. In a heavy skillet over medium-high heat, cook the sausages until they release their fat and are cooked through, about 3-5 minutes. If desired, remove and discard all but about 2 tablespoons of fat from the skillet.
2. Add the onions and garlic to skillet and cook while stirring about 5 minutes, until tender but not browned.
3. Add broth, water, lentils, tomatoes, carrots, salt, thyme, and black pepper.
4. Bring to a boil, reduce heat and simmer partially covered for 45 minutes to 1 hour until lentils are tender. Taste and adjust seasonings.
5. If desired, sprinkle with fresh parsley before serving.
***
Kiwi-Berry Pavlova
(Martha Stewart, Everyday Food)

This recipe is essentially a meringue topped with whipped cream and an assortment of fruits -- the choices and colors can change with the season or celebration. Think Fourth of July, St. Patrick's Day. Save the egg yolks and make a custard or hollandaise sauce to ladle over asparagus.
Time: 3 hours, plus 2 1/2 hours to cool in the oven
Yield: 6-8 servings
Ingredients:
1 cup sugar
1 tablespoon cornstarch
4 large egg whites, room temperature
1 teaspoon fresh lemon juice
1/4 teaspoon salt
1 cup heavy cream
1/2 teaspoon pure vanilla extract
3 kiwis, peeled, halved lengthwise, and thinly sliced crosswise
2 cups fresh raspberries
(Other fruits can be substituted, such as blueberries or strawberries)
Instructions:
1. Preheat oven to 200 degrees, with rack in center. Line a large rimmed baking sheet with parchment paper and set aside.
2. In a small bowl, whisk sugar and cornstarch until combined.
3. Make meringue: In a large mixing bowl, using an electric mixer on medium speed, beat egg whites, lemon juice, and salt until very frothy. Add 1 tablespoon of the sugar mixture every 30 seconds, until stiff, glossy peaks form, about 8 minutes total, scraping down sides of bowl halfway through.
4. Mound meringue onto prepared baking sheet; gently spread to a 9-inch circle, with a well in the center and a 1-inch raised border around the edge.
5. Bake until shell is crisp on the outside and marshmallowy on the inside, about 2 1/2 hours (reduce oven temperature to 175 if it starts to brown). Turn oven off; let meringue dry out in closed oven for another 2 1/2 hours, or up to overnight.
6. Just before serving, using an electric mixer, beat cream and vanilla in a medium bowl until soft peaks form. Fill shell with whipped cream, and top with fruit. To serve, use a serrated knife to cut into wedges.
***
Today we need humor and kindness more than ever. This photo was sent to me from a friend. Enjoy!

***
Pasta with Marinated Artichokes and Sun-dried Tomatoes
(from the kitchen of Debra Scuracchio)


Time: 1/2 hour
Yield: 6-8 servings
This is a quick pasta dish when you want something fast and easy to make, but delicious and colorful. Debra has passed the recipe on to newlyweds who may not know how to cook. She suggests a good Montepulciano wine to accompany the meal.
Ingredients:
Two jars of marinated artichokes (6 oz each)
One package of sun-dried tomatoes (8 oz)
One pound of pasta, such as penne or rigatoni
One cup of grated cheese, such as Parmesan, Pecorino, or Romano
Instructions:
1. Chop the marinated artichokes in a medium-size bowl. Do not drain the liquid as you will be using it for the sauce.
2. Put the sun-dried tomatoes in a glass bowl, fill with water to just cover, and then microwave for about 3-5 minutes until tomatoes are softened. Drain and chop the tomatoes.
3. Add the tomatoes to the marinated artichokes. 4. Boil pasta according to the instructions on the box. Drain pasta, save a cup of the pasta water and put aside. 5. Put the pasta in a large bowl and add the marinated artichokes with the sun-dried tomatoes and mix well. Add some of the pasta water and/or extra virgin olive oil to moisten and mix well.
6. Sprinkle the pasta with grated cheese and, if you like, serve the dish with crusty bread and a salad of greens to complement the dish.

Debra is a virtual merchandising/ staging artist and print production manager. She also does the props for the North Fork Community Theater in Mattituck, LI. Her squeeze, John Marino, is a mixologist and was the "anonymous" friend who submitted the Fish Taco recipe above.
***
Bess Feigenbaum's Cabbage Soup
(Zoë Feigenbaum, Bess's granddaughter, adapted from The National, Manhattan, NY;
Photo credit: Christos Katsiaouni)

"We're cooking with a lot of cabbage right now. I think that's because I like cabbage for its ability to be many things, including, once you get rid of those outer leaves ... you've got all that tender, fresh, clean, perfect cabbage flesh inside that makes a beautiful, crunchy, raw deliciousness thing on your plate at a time when sometimes fresh vegetables are few and far between, and we're cooking more with canned tomatoes and beans..." (Sam Sifton, interviewed by Dave Davies on Fresh Air, NPR, April 7, 2020.)
Cooked cabbage is a totally different beast. Here we have a wonderful soup recipe contributed by Zoë Feigenbaum, the former owner/chef of her eponymous restaurant on the Lower East Side, New York City. With a variety of cabbages -- green, red, Napa, Savoy, Chinese -- you can experiment with different kinds and see which you prefer.
Yield: 8 servings
Time: 3 hours
Ingredients:
2 tablespoons olive oil
2 tablespoons minced garlic
1 cup minced or grated onion
9-12 cups water
1 cup peeled thinly sliced carrots
1 28-ounce can plum tomatoes in purée
1 cup tomato paste
1/2 cup tomato ketchup
1/2 cup dark brown sugar
1 bay leaf
1/2 cup lemon juice
3 pounds cabbage (tough outer leaves, core and ribs removed), sliced into 1/4/inch-wide ribbons
1/2 cup golden raisins
Fresh ground (preferably medium grind) black pepper
Sour cream, optional
Instructions:
1. In a 6-quart pot over medium-low heat, heat olive oil and add garlic. Cover and cook until garlic is tender but not browned, about 2 minutes.
2. Add onion and sauté until translucent.
3. Add 3 cups water, carrots, tomatoes in purée, tomato paste, ketchup, brown sugar, and bay leaf. Simmer at a lively bubble for 10 minutes.
4. Then crush whole tomatoes with potato masher or fork. Continue to simmer until carrots are tender, about 10 minutes. Discard bay leaf. 5. Using an immersion blender, or working in batches with a stand blender, process mixture until it is course, not puréed.
6. Return sauce to pot and add lemon juice, cabbage ribbons, and 3 cups water. Place over medium-high heat and cook at a lively simmer until cabbage is cooked to taste, from al dente to meltingly soft, 1-2 hours.
7. Add 3-6 cups water to thin to desired consistency.
8. 10 minutes before serving, stir in raisins and a few twists or black pepper. If desired, garnish each serving with a dollop of sour cream.
***
Pantry Crumb Cake
(Melissa Clark, New York Times Cooking, March 25, 2020)


Melissa Clark described this cake as more of a snack or breakfast sweet than a showy dessert. It's the kind of pastry -- made with (lots of) brown sugar and butter -- that a small family can eat in several days or a single person can freeze. It can also be tweaked by the baker -- to use spices one likes, to substitute more flour or chopped nuts for oats, or to use whatever fruit one desires. When freezing the cake, she advises wrapping each slice separately and then storing them in a container in the freezer, ready for thawing (in under an hour) when the desire for a sugar fix hits. Metric measurements are also given as they are more precise for baking. (P.S. Don't get discouraged by the number of ingredients or length of this recipe. It's very easy!)
Yield: 1 (8- or 9-inch) round or square cake, about 20 squares
Time: 1 hour
Ingredients:
For the Topping:
1/2 cup/110 grams packed light or dark brown sugar
1/4 cup/55 grams unsalted butter (1/2 stick), melted
1/4 cup/30 grams all -purpose flour
1/4 cup/20 grams old-fashioned oats
1 teaspoon ground spices (cinnamon, ginger, cardamon, nutmeg or a combination)
1/2 teaspoon fine sea salt
For the Cake:
1 1/2 cups/190 grams all-purpose flour
1 teaspoon baking powder
1/4 teaspoon baking soda
1/2 teaspoon fine sea salt
1/2 cup/115 grams unsalted butter (1 stick), at room temperature
1/2 cup/100 grams granulated sugar
2 large eggs
2 teaspoons vanilla extract
2/3 cup/160 milliliters sour cream, yogurt or nondairy yogurt, buttermilk, crème fraîche, or milk acidified with 1 tablespoon lemon juice 1 teaspoon grated lemon or orange zest (optional) 1/2 cup fresh, frozen and thawed, or canned fruit, such as blueberries, raspberries, cherries, grated apple or pear, chopped pineapple (optional)
Instructions:
1. Heat oven to 350 degrees. Butter an 8- or 9-inch square pan.
2. Prepare the topping: Add all the topping ingredients to a medium bowl. Use a rubber spatula until they all start to clump together. Squish or roll the mixture into mostly large crumbs with some smaller ones. 3. Prepare the cake: In a medium bowl, whisk together the flour, baking powder, baking soda and salt until combined. 4. In the bowl of an electric mixer fitted with the paddle attachment, beat the butter and sugar at medium speed until creamy and smooth, 1 to 2 minutes. Beat in the eggs, one at a time, then beat in vanilla extract. Add half of the flour mixture, then beat in the sour cream. Add the remaining flour, and mix, just until incorporated, scraping down the sides of the bowl. Fold in the zest and fruit, if using.
5. Pour the batter into the baking pan and top evenly with the crumbs. Bake for 45 to 55 minutes, or until a toothpick inserted in the center comes out clean. Let the cake cool in the pan.
***
Steamed Fish with Ginger
(Recipe by Lemochka, from www.allrecipes.com, adapted by Daisy Schnepel)

This recipe was contributed by my sister who is an excellent cook. She adapted the original recipe in creative ways to improve on it. While she has never studied culinary arts or taken a cooking class, in 1971 she had a summer job working in the kitchen of the Boston Children's Zoo. Rather than just preparing the meals according to the particular and special diets of the animals, she used her artistic talents to make colorful displays with a focus on food presentation for the animals' daily dining experience. But beware! One day she was bitten by a little mouse and s/he quickly became the meal for the boa constrictor!
Daisy's comments: "It's very simple! And it tasted delicious, as if I'd ordered out at a good Asian restaurant." So if you like fish and Asian food, you'll love this recipe!

Wines suggested by my sommelier brother-in-law, Paul Evans, to accompany the meal are white wines, such as a Sancerre. He hesitates to suggest a maker because stores in different regions use different distributors. For their dinner he selected an Austrian Gruner Veltliner.
Yield: 2-3 depending upon portion size
Time: 25 minutes (15 minutes for prep and 10 minutes for cooking)
Ingredients:
1 pound halibut fillet
3-4 baby bok choy, leaves cut from stems
1/2 cup pea tendrils (optional)
1 teaspoon coarse sea salt or kosher salt
1 tablespoon minced or grated fresh ginger
3 tablespoons thinly sliced green onions
1 tablespoon dark soy sauce
1 tablespoon light soy sauce
1/2 pound shitake mushrooms, cut up and sautéed in peanut or olive oil
1 tablespoon peanut oil
2 teaspoons toasted sesame oil
1/4 cup lightly packed fresh cilantro sprigs (optional)
rice, such as jasmine
Instructions:
1. Pat halibut dry with paper towels. Make sure skin is removed. Rub both sides with salt. Scatter the ginger over the top of the fish. 2. Line a box steamer with the baby bok choy leaves, then the pea tendrils. Place the fish on top of the vegetables in the steamer set over several inches of gently boiling water, and cover. Gently steam for 10 to 12 minutes.
3. Pour accumulated water out of the dish and sprinkle fillet with green onions.
4. Heat peanut and sesame oils in a small skillet over medium-high heat until they begin to smoke. When the oil is hot, carefully pour on top of the halibut fillet. The very hot oil will cause the green onions and water on top of the fish to pop and spatter all over, so be careful.
5. Drizzle the soy sauce combination over the cooked fish.
6. Top with sautéed shitake mushrooms.
7. Garnish with cilantro sprigs (optional) and serve immediately on a bed of rice.

With a Masters degree in Industrial Design from Rhode Island School of Design (RISD) in Providence, Daisy began as a woodworker and furniture designer. She now spends her time involved in philanthropic projects and historic home restoration. On weekends she shows her two shelties, Cyrus (to the left) and Celeste (below right).


A wonderful cookbook for fish recipes from a New York restaurateur cum fisherman.
David Pasternak is a passionate fisherman and chef of New York's Esca.
Here is a collection of 100 simple yet remarkable seafood recipes for cooks of all skill levels -- inventive and comforting, complexly flavored yet simply prepared, Italian-inspired.
***
Pasta Primavera (source: unknown)
What do you serve guests with health issues that determine what they can and cannot eat? I had that dilemma a while ago when I invited friends for dinner. One was a vegetarian due to doctor's orders but couldn't eat tomatoes, onions, and hot spices, while another loved chocolate but couldn't indulge in it -- a rarity in my household! Fortunately there was no need for gluten-free food or other dietary restrictions so I chose a pasta recipe -- pasta primavera. As its name suggests, the dish is perfect for spring, but you can make it any time of the year using whatever produce and vegetables are in season and fresh. It is also delicious served cold the next day.

For dessert I made the pavlova recipe (included in this blog) because it does not call for chocolate.
Yield: 4 servings
Time: 30 minutes (10 minutes for prep and 20 minutes cook time)
Ingredients:
7 oz. (200 grams) pasta of your choice (I used squid-ink pasta for its color)
1 tablespoon extra virgin olive oil
2 cloves of garlic, sliced
1/4 chopped zucchini
1/2 chopped onion
1/2 chopped red bell pepper
1 chopped carrot
1 cup (140 grams) chopped asparagus
1 cup (120 grams) frozen peas (I used canned peas)
1 teaspoon sea salt
1/4 teaspoon ground black pepper
1 tablespoon flour (brown rice flour or another flour can be substituted)
1 cup (250 ml) water or vegetable broth
juice of half a lemon
handful of fresh basil, chopped (optional)
(other spices or herbs to liven up the dish if you want, such as cayenne pepper, herbes de Provence, etc., and that your guests can tolerate!)
Instructions:
1. Cook pasta according to package directions (I usually do this step once the vegetables have been prepared, especially if I'm using a pasta that cooks quickly.)
2. Heat the oil in a skillet and add the veggies, except for the frozen (or canned) peas
3. Cook over medium-high heat until golden brown but not too soft.
4. Add the peas, salt, pepper and flour and cook for another minute.
5. Add the water or vegetable broth, stir and cook for another 5 minutes. For those who like a spicier dish, this is when you can add herbs or spices of your choice.
6. Add the cooked pasta (drained), the lemon juice and the basil, stir and serve.
***
Food: Leave It for Leftovers - by Karen Kiaer and Jacquie Ottman
(https://shelterislandreporter.timesreview.com/2020/05/04/food-leave-it-for-leftovers/)

Leftovers that look like a first run production --
chicken salad with grapes
When life gives you lemons, make lemonade. Sheltering in place on Shelter Island, where food options can be limited even in normal times, we’re challenging ourselves to be creative about what we buy and what we cook.
Whether living alone or with an extended family, we can tap into our creativity and make satisfying, nutritious and tasty meals. We personally are focused on making the most of leftovers, which are always in abundance regardless of the times or season. Here are some of our tips:
Buy food that can be used in multiple ways
• Transform a pound of chopped chuck or sirloin into a meatloaf, sandwiches, and meatballs for Italian Wedding Soup.
• Enjoy a roast chicken today, and downcycle it tomorrow into a salad or sandwiches and eventually a tasty stock.
• Open a can of tomato sauce or make your own with a 28-ounce can of diced tomatoes (available at the IGA), and use it to top spaghetti and meatballs. Extend it with broth and leftover rice as a hearty soup, and make homemade pizzas with pita or English muffins.
• Eat carrots raw, mixed into salads, cooked glazed in a pan, or roasted.
• Eat eggs for breakfast, lunch, and dinner. Start the day with an omelet or frittata stuffed with yesterday’s veggies. Make egg drop soup by whisking one into a simple broth or break one over a bowl of ramen noodles.
• Cook rice as a tasty side dish, or the basis for risotto and casseroles. Just like Chinese cooks, turn day-old rice mixed with meat strips, veggies and scallions into fried rice.
Buy ingredients that can help transform leftovers
• Just a few staples in the pantry, fridge and spice rack can help transform leftovers by adding flavor, texture and nutrition.
• Add color and flavor to any protein via sprigs of fresh tarragon, rosemary, thyme, basil and parsley.
• Make an easy soup by dropping bouillon cubes into water along with yesterday’s veggies or chicken and some noodles or rice.
• Use breadcrumbs (ideally home-made from the ends of loaves and broken crackers) to give crunch to a mac-and-cheese casserole, or to coat fish and chicken before a quick sauté.
Share
• Inviting neighbors over for a potluck of leftovers is off the table, but there’s still lots that we all can share from a distance to extend our food resources:
• Share your own recipes and tips for extending food with friends, family and neighbors on social media.
• Share extra food with seniors and friends who live alone.
• Bring canned goods that you are not using to the Food Pantry at the Shelter Island Presbyterian Church. For more information call 631-749-0309.
• Share your composter with neighbors whom you trust to make deposits of clean organics — no plastic or bones.
Makeover restaurant leftovers
• Doggy bags are popular because they can help save time and money.
• Good cooks know, too, that the remains of sauces, sides and even the bread basket can jumpstart exciting new meals.
• Keep local restaurants going in these tough times by ordering extra portions, and use the leftovers to create new meals (even tomorrow’s fancy French Toast).
Teach your children well
Cooking your way through a pandemic is a great time to teach kids to appreciate food and enhance family togetherness.
• Create fond memories of making bread, pancakes, smoothies and other items with parents and grandparents. It’s an opportunity to instill lifelong cooking skills, too.
• Demonstrate how to warm up spaghetti and meatballs in a frying pan, and reheat pizza in the oven – not the microwave! — and just have fun.
This article was originally published on May 4, 2020, in The Shelter Island Reporter. Karen Kiaer is a lifelong resident of Shelter Island. Jacqui Ottman, her house guest, is researching a book on leftovers. Many of the ideas and tips are things that you can do, no matter how large or small your family. Substitute your own local supermarket, food pantry, or religious institution for the Shelter Island organizations mentioned here.

"Beauty and the Breast" -- From a single whole chicken, chicken thighs and breasts were cooked. Leftovers were used to make the aesthetically pleasing chicken salad with grapes pictured at the beginning of this post.
(Photos courtesy of Jacquie Ottman)
***
Salmagundi
Should you find yourself in the mood for a departure from the daily culinary routine and a chuckle, here's a Salmagundi recipe (courtesy of Wikipedia) from Mrs. Hill's New Cookbook, published in 1867. Unfortunately we have no photos. There will be an as yet undetermined prize for the person who sends photos for this unexpected, but delightful contribution!
Boil two calf's feet; take the feet out when done; reduce the broth to a quart. The feet may be fried and used, first removing the bones. Let the broth become cold in an earthen vessel; scrape off all the grease; wipe the top of the jelly with a coarse towel; put the cake of jelly into a kettle lined with tin or porcelain; season it with two lemons cut up (removing the seed), fine blades of mace, a stick of cinnamon, pepper (white pepper is best), and salt to taste. Beat to a froth the whites of six eggs; stir these to the jelly just as it melts; it must then be left to clarify and not stirred again. When it simmers long enough to look clear at the sides, strain it through a flannel bag before the fire; do not squeeze the bag. Suspend it by running a stick through a loop made by tying the bag; rest each end of the stick upon a chair, and throw a table-cloth over all to keep out the dust. If the jelly does not run through clear the first time, pour it through the jelly-bag again. Set this aside. Prepare the meat and seasoning for the pie. Put into a stew-pan slices of pickled pork, using a piece of pork four inches square; if it is very salt[y] lay it an hour in tepid water. Cut up two young, tender chickens—a terrapin, if it is convenient—two or three young squirrels, half a dozen birds or squabs. Stew them gently, cutting up and adding a few sprigs of parsley. Roll into half a pound of butter two tablespoonfuls of flour; add this to the stew until the meat is nearly done. Line a fire-proof dish, or two fire-proof dishes (this quantity of stew will fill two common-sized or quart dishes;) with good pastry; mix the different kinds of meats; put in Irish potato dumplings; season to taste; pour in the gravy and bake. When done, remove the upper crust when the pie is cold and pack in the jelly, heaping the jelly in the middle. Return the crust and serve cold or hot. The jelly will prevent them become too dry. They are good Christmas pies and will keep several days. Very little gravy should be used, and that rich. Should there be too much, leave the stew-pan open until reduced sufficiently. This kind of pie keeps well if made in deep plates, and by some is preferred to those baked in deep moulds.
***


Comments